There are countless nostalgic desserts that take us back to simpler days—milkshakes, carnival candy apples, diner sundaes, banana splits, and hand-stirred sodas. But every once in a while, a fun modern twist revives the magic of the past in an unexpectedly delightful way. Vanilla Milkshake Candy Apples do exactly that.
This charming treat blends the creamy, dreamy flavor of a classic vanilla milkshake with the crunch and shine of a traditional candy apple, creating a dessert that is visually stunning, playful, and irresistibly delicious. Whether you’re planning a retro-themed party, hosting a special event, preparing seasonal sweets, or simply want something unique for your dessert table, these candy apples offer a show-stopping option that everyone will talk about.
But beyond their beauty, what makes these candy apples special is how approachable they are for home cooks. You don’t need pastry-chef skills, complicated tools, or hours of baking. The recipe is simple, the method is enjoyable, and the results always feel like something crafted with love and creativity.
This comprehensive guide dives deep into everything you need to know: how to prepare the apples properly, how to achieve a flawless creamy coating, how to master the retro look, how to customize flavors, how to store them, and how to transform a simple apple into a conversation-starting dessert centerpiece.
This article is written to be user-friendly, Google-optimized, informative, and engaging—whether you’re a home baker or a food enthusiast looking for something fresh and impressive.
Why Vanilla Milkshake Candy Apples Are So Popular
1. They Combine Two Iconic Desserts
Milkshakes and candy apples have long been staples of American food culture. Bringing these two together creates a fusion that is both nostalgic and innovative. The creamy vanilla coating mimics the flavor of a classic milkshake, while the apple provides the crisp, refreshing base.
2. They Are Visually Striking
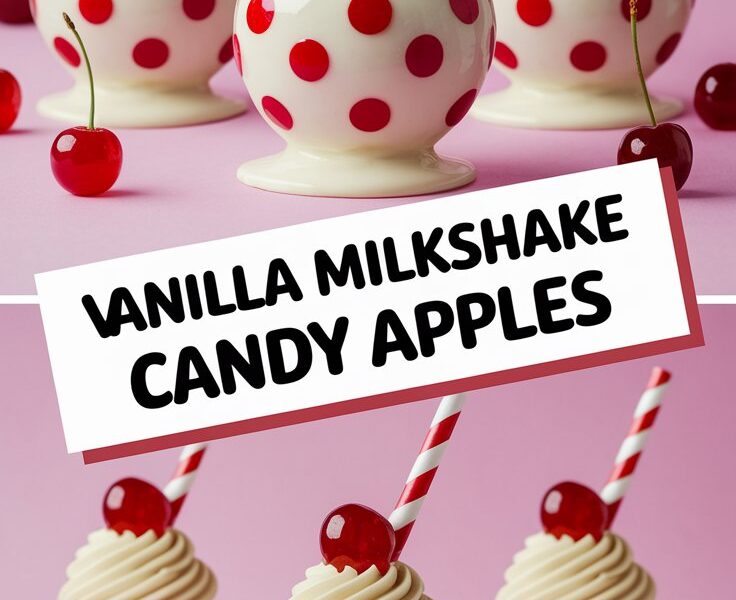
The bright white coating, red polka dots, whipped cream swirl, and maraschino cherry form a picture-perfect design that looks like something straight out of a retro diner. These apples naturally attract attention—whether displayed at parties, photographed for social media, or arranged on a dessert table.
3. They Are Fun to Customize
Every part of this dessert allows room for creativity:
- Coating colors
- Flavor extracts
- Toppings
- Sprinkles
- Swirls
- Themes
From holidays to birthdays to themed gatherings, the possibilities are endless.
4. They Are Easy Enough for Beginners
Despite the aesthetic appeal, the recipe is extremely approachable. With simple melting, dipping, and decorating steps, anyone can make these at home.
5. They Create a Multi-Texture Experience
A great dessert balances textures:
- Crunch: apple skin
- Juice: bite into freshness
- Creaminess: vanilla candy shell
- Softness: whipped topping
- Sweet burst: maraschino cherry
Each bite feels layered, exciting, and satisfying.
Ingredients: Choosing the Best Components
Your ingredients set the foundation for flavor and texture. Here is a deeper look into the ideal choices and why they matter.
1. Apples
The best varieties include:
- Granny Smith – tart, crisp, sturdy
- Honeycrisp – juicy, sweet, balanced
- Gala – mild flavor, holds coating well
- Fuji – extra sweet and firm
The apple’s natural acidity balances the sweetness of the candy coating beautifully.
Tip:
Smaller apples often work better—they’re easier to coat, hold, and decorate.
2. Wooden Sticks or Decorative Straws
Red-striped paper straws give the apples a vintage soda-shop feel, while wooden sticks provide stability. Choose whatever matches your theme.
3. White Candy Melts or White Chocolate
Candy melts are smooth, durable, and perfect for coating apples. They create a vibrant, even shell without seizing.
White chocolate is richer and creamier but can require more care when melting.
4. Heavy Cream or Vegetable Shortening
Heavy cream creates a soft, milkshake-like consistency.
Shortening leads to a thinner, more glassy coat.
5. Vanilla Extract
This is where the “milkshake” flavor begins. Choose a good-quality pure extract for best results.
6. Red Candy Melts
Used for polka dots—these complete the retro look and add a fun contrast.
7. Whipped Cream
Homemade whipped cream adds freshness and elegance. Use heavy whipping cream, powdered sugar, and a touch of vanilla extract.
8. Maraschino Cherries
A signature retro garnish, adding color, moisture, and visual charm.
How to Make Vanilla Milkshake Candy Apples (Step-By-Step Guide)
Here is a thoroughly detailed method to help you achieve beautiful, professional-looking results.
Step 1: Prepare the Apples
- Wash the apples under warm water.
- Dip each apple in hot water briefly to remove the wax coating.
- Dry thoroughly—any moisture prevents the candy from sticking.
- Insert the wooden stick or retro straw deeply into the apple’s stem end.
- Refrigerate for 10–15 minutes. Cold apples help the coating set faster.
Step 2: Make the Vanilla Candy Coating
- Melt the white candy melts in short intervals.
- Add heavy cream or shortening gradually to control thickness.
- Stir in vanilla extract for flavor.
- Dip each apple carefully, letting excess drip off.
- Set on parchment paper to harden.
Step 3: Add Retro Red Polka Dots
- Melt red candy melts separately.
- Transfer to a piping bag.
- Create small circular dots all over the apple surface.
- Let them set.
Step 4: Make the Whipped Cream Topping
- Whip heavy cream, vanilla, and powdered sugar until soft peaks form.
- Transfer to a piping bag fitted with a star tip.
- Pipe a swirl on top of each apple.
Step 5: Add Cherries and Serve
- Place a maraschino cherry on each swirl.
- Refrigerate to maintain freshness.
- Serve chilled for best texture.
The Science Behind Perfect Candy Apples
Understanding the “why” behind each step helps you achieve the best results every time.
Why Remove Wax?
Wax prevents candy coating from sticking smoothly. Even tiny traces cause slipping or air bubbles.
Why Chill Apples?
Cold apples help the melted coating firm up quickly, giving a cleaner finish.
Why Add Cream or Shortening?
They change viscosity:
- Cream → softer, milkshake-like bite
- Shortening → thinner, glossy shell
Why Add Vanilla After Melting?
Extracts added too early can cause seized chocolate. Adding them after melting keeps the mixture smooth.
Expert Tips for Success
- Always dry apples thoroughly.
- Avoid overheating chocolate.
- Don’t rush setting time.
- Use high-quality vanilla for best flavor.
- Keep whipped cream cold for stability.
- Add cherries right before serving for freshness.
Flavor Variations (Creative and Fun)
✅ Chocolate Milkshake Apples
Use milk chocolate melts with chocolate extract.
✅ Strawberry Milkshake Apples
Use pink melts + strawberry extract.
✅ Cookies & Cream Apples
Mix crushed chocolate wafers into the coating.
✅ Funfetti Milkshake Apples
Add rainbow sprinkles under the whipped topping.
✅ Caramel Milkshake Apples
Drizzle warm caramel over the vanilla shell.
✅ Vegan Milkshake Apples
Use dairy-free white chocolate + coconut cream.
Serving Ideas
- Dessert platter at parties
- Retro-themed events
- Weddings and baby showers
- Classroom treats
- Carnival-style festivals
- TikTok or Pinterest-worthy dessert boards
These apples also make charming edible gifts when wrapped individually in clear treat bags with ribbon.
How to Store Vanilla Milkshake Candy Apples
- Store in an airtight container.
- Refrigerate for up to 2–3 days.
- Keep whipped topping as fresh as possible.
- Do not freeze—the texture of apples changes dramatically.
FAQs
1. Can I make them ahead of time?
Yes, but add whipped cream and cherries before serving.
2. Why is my coating slipping off?
The apples may still have moisture or wax.
3. Can I use real white chocolate?
Yes! Just melt carefully and avoid overheating.
4. Can I make mini versions?
Absolutely—use small apples or dip apple slices.
5. How do I fix thick candy coating?
Add a tablespoon of shortening or cream.