There’s something magical about the moment you mix two beloved desserts together—but what if you go even further and blend three? Welcome to the indulgent world of Oreo Brookies, where fudgy brownies, chewy cookies, and crunchy Oreos meet in one glorious, layered masterpiece.
Imagine biting through a crisp top that gives way to a dense brownie, a soft cookie base, and the unmistakable crunch of Oreo cookies in between. Each layer brings its own texture, sweetness, and character—together forming a dessert that feels both nostalgic and brand-new.
Whether you’re an experienced baker looking to impress or a beginner craving something decadent yet easy, this Oreo Brookies recipe will quickly become a household favorite. Ready in under an hour, it transforms simple pantry staples into a bakery-quality treat you’ll want to bake again and again.
What Are Oreo Brookies?
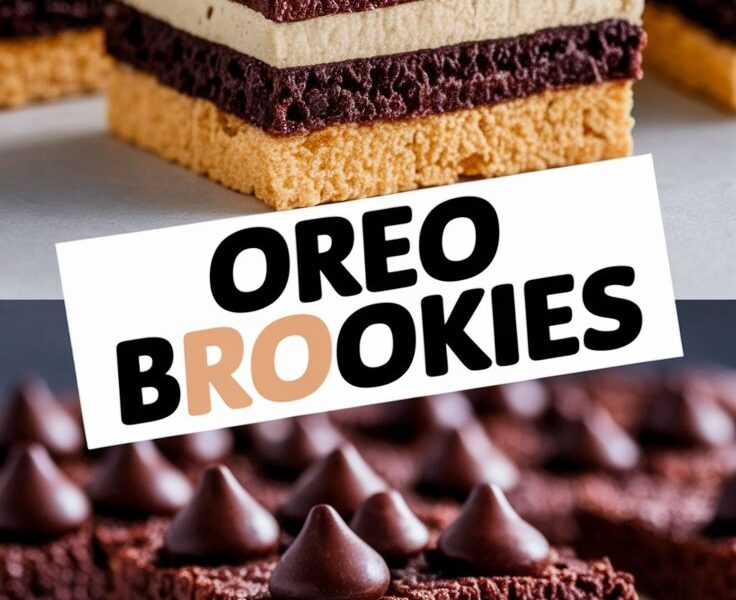
The word “Brookie” is a playful mash-up of “Brownie” and “Cookie.” Traditionally, brookies combine layers of cookie dough and brownie batter, baked together for a dual-texture dessert.
Our version goes one step further by introducing a secret middle layer—Oreos. These iconic cookies not only create visual appeal when you slice through the bars but also deliver a delightful crunch that balances the gooeyness of the brownie and the chew of the cookie dough.
So, in short:
- Bottom layer: Soft, buttery chocolate-chip cookie dough.
- Middle layer: Whole Oreo cookies for crunch and contrast.
- Top layer: Deep, chocolatey brownie batter.
When baked, the three merge beautifully into a dessert bar that’s chewy at the base, fudgy on top, and perfectly crisp in the middle.
Why You’ll Fall in Love with This Recipe
1. Triple-Layered Perfection
Every bite gives you three textures—crunchy, chewy, and fudgy—each balanced with just the right amount of sweetness.
2. Easy and Foolproof
Even if you’re new to baking, this recipe is straightforward. You can mix both batters in separate bowls using just a whisk and spatula—no fancy equipment needed.
3. Crowd-Pleaser for Every Occasion
From birthday parties to cozy movie nights, Oreo Brookies never fail to impress. They pack beautifully for school lunches or holiday cookie boxes, too.
4. Customizable and Fun
You can change the flavor easily—try mint Oreos for freshness, peanut butter chips for richness, or red velvet batter for Valentine’s Day.
5. Perfect Make-Ahead Dessert
Brookies keep well for days, actually tasting better after resting overnight as the flavors meld together.
Ingredients You’ll Need
Let’s dive into the delicious building blocks of this recipe.
(Measurements are listed in U.S. cups and metric equivalents.)
For the Cookie Layer
- ½ cup (115 g) unsalted butter, softened – adds richness and smooth texture.
- ½ cup (100 g) brown sugar – provides moisture and a caramel note.
- ¼ cup (50 g) granulated sugar – balances sweetness and structure.
- 1 large egg – binds ingredients and adds chewiness.
- 1 teaspoon vanilla extract – enhances the flavor profile.
- 1¼ cups (155 g) all-purpose flour – provides structure.
- ½ teaspoon baking soda – gives lift and a soft crumb.
- ¼ teaspoon salt – balances sweetness.
- ½ cup (90 g) semi-sweet chocolate chips – melts beautifully into the dough.
For the Oreo Layer
- About 16 Oreo cookies (whole) – the star of the middle layer; provides that iconic crunch.
For the Brownie Layer
- ½ cup (115 g) unsalted butter, melted – keeps the brownie moist and rich.
- 1 cup (200 g) granulated sugar – gives a glossy, fudgy finish.
- 2 large eggs – add structure and chew.
- 1 teaspoon vanilla extract – ties the chocolate flavors together.
- ⅓ cup (40 g) unsweetened cocoa powder – creates deep, dark chocolate flavor.
- ½ cup (65 g) all-purpose flour – keeps the brownie dense but not heavy.
- ¼ teaspoon salt – enhances the cocoa taste.
- ½ teaspoon baking powder – ensures just enough lift.
- Optional: Extra chocolate chips on top for extra decadence.
Step-by-Step Instructions
Step 1: Prep the Pan and Preheat
Set your oven to 350°F (175°C). Line an 8×8-inch (20×20 cm) pan with parchment paper and lightly grease it. Leave a bit of overhang on the sides for easy removal later.
Step 2: Make the Cookie Dough Base
In a large bowl, cream the softened butter, brown sugar, and granulated sugar until fluffy—about two minutes.
Add the egg and vanilla, mixing until smooth.
Sift in the flour, baking soda, and salt. Stir gently until no dry streaks remain. Fold in chocolate chips.
Press the dough evenly into the prepared pan. It’s okay if it looks slightly rustic—the heat will even it out.
Step 3: Add the Oreo Layer
Lay the Oreos in a single layer over the cookie dough. Press gently so they sink slightly. Try to cover as much surface area as possible—16 cookies usually fits perfectly in an 8×8 pan.
Step 4: Make the Brownie Batter
In another bowl, whisk the melted butter and sugar together until glossy. Add the eggs and vanilla, and whisk until thick and shiny.
Sift in the cocoa powder, flour, baking powder, and salt. Stir until just combined—do not overmix or your brownies may become cakey.
Step 5: Assemble and Bake
Pour the brownie batter evenly over the Oreos, smoothing the top with a spatula. Sprinkle extra chocolate chips if you’d like a bakery-style finish.
Bake for 35–40 minutes, or until the top looks set and a toothpick inserted into the center comes out with a few moist crumbs.
Allow the brookies to cool completely in the pan—this helps the layers firm up for clean slicing.
Tips for Perfect Oreo Brookies
- Use room-temperature ingredients. Cold butter or eggs can prevent even mixing.
- Don’t overmix your brownie batter. It should be thick and glossy, not airy.
- Cool completely before cutting. The layers set as they cool; slicing too early can cause the brownies to collapse.
- Line the pan properly. Parchment makes it easy to lift out the bars without breaking layers.
- Use a sharp, hot knife. Wipe between cuts for clean, Instagram-ready squares.
Flavor Variations to Try
1. Peanut Butter Brookies
Add dollops of creamy peanut butter between the Oreo and brownie layers before baking. The result is a salty-sweet twist that’s impossible to resist.
2. Mint Chocolate Brookies
Swap in mint-flavored Oreos and add ½ teaspoon of peppermint extract to the brownie batter for a cool, refreshing version.
3. Red Velvet Brookies
Use red velvet cookie dough at the base and regular brownie batter on top for a stunning color contrast.
4. Nutty Crunch Brookies
Fold chopped walnuts, pecans, or almonds into the brownie layer for a rich, nutty flavor.
5. Gluten-Free Brookies
Use a gluten-free flour blend instead of all-purpose flour. The taste and texture remain deliciously indulgent.
Serving Suggestions
- Warm with ice cream: Serve a square topped with vanilla or cookies-and-cream ice cream.
- With coffee or milk: Perfect for afternoon snacks or midnight cravings.
- As a dessert platter: Cut into small bites and drizzle with chocolate or caramel sauce for parties.
- Holiday treat boxes: Pack individually wrapped squares for gifting during the festive season.
- Fancy presentation: Dust with powdered sugar or add a swirl of whipped cream and crushed Oreos on top.
How to Store and Freeze
- At room temperature: Store in an airtight container for up to 3 days.
- In the refrigerator: Keeps fresh for up to a week.
- To freeze: Wrap each square individually and store in a freezer-safe bag for up to 1 month.
To serve, thaw at room temperature or microwave for 10–15 seconds for that fresh-baked warmth.
Common Mistakes to Avoid
- Baking too long: Overbaking makes the brownie layer dry. Remove when a few moist crumbs cling to the tester.
- Skipping parchment paper: Without it, the layers may stick or crumble when removed.
- Uneven spreading: Smooth each layer gently to ensure even baking.
- Using too much flour: Measure accurately using the spoon-and-level method.
- Rushing the cooling process: Patience pays off—let the brookies cool fully for perfect texture.
FAQs About Oreo Brookies
Can I make them ahead of time?
Absolutely. Prepare and refrigerate the unbaked layers overnight. Bake the next day as directed for fresh, gooey brookies.
Can I double the recipe?
Yes! Simply use a 9×13-inch pan and double all ingredients. Bake for about 45–50 minutes.
Can I use store-bought brownie mix?
You can, but homemade batter gives superior flavor and control over sweetness. If using a mix, reduce the sugar slightly in the cookie dough.
Can I use flavored Oreos?
Definitely! Try golden Oreos for a vanilla twist, mint for a cool touch, or peanut butter Oreos for extra richness.
How do I make them extra fudgy?
Use melted butter instead of oil, and avoid overbaking. The center should still look slightly soft when you remove it from the oven.
Nutrition (Per Serving)
| Nutrient | Amount |
|---|---|
| Calories | ~250 |
| Sugar | 20 g |
| Fat | 12 g |
| Saturated Fat | 7 g |
| Carbohydrates | 32 g |
| Protein | 3 g |
| Fiber | 1 g |
| Sodium | 150 mg |
| Cholesterol | 40 mg |
(Values approximate for 16 servings.)
Expert Tips for Professional-Quality Results
- Chill before slicing: Pop the pan in the fridge for 30 minutes; this gives the neatest bars.
- Upgrade with espresso: Add ½ teaspoon instant coffee to the brownie layer—it enhances chocolate depth.
- Salted finish: Sprinkle flaky sea salt on top right after baking for a gourmet touch.
- Texture contrast: For a crisper bottom, chill cookie dough for 10 minutes before layering.
- Decorate for the season: Add Halloween sprinkles, Christmas M&Ms, or pastel drizzle for Easter.
Pairing Ideas
Pair your Oreo Brookies with:
- Cold milk for nostalgia.
- Espresso for intensity.
- Berries for a light, tart contrast.
- Vanilla milkshake for an over-the-top treat.
- Whipped cream dusted with cocoa for presentation flair.
Why This Recipe Works (Baker’s Science)
Each layer performs a different role:
- The cookie dough contains more fat and sugar, so it stays chewy and provides a sturdy base.
- The Oreos act as a structural and textural bridge.
- The brownie batter, poured on top, has higher moisture and sets with a glossy crust.
As the three bake together, heat causes sugar caramelization at different rates—creating that magical harmony of crisp, gooey, and crunchy textures.
It’s simple food chemistry, but it tastes like pure dessert genius.
Presentation & Photography Tips (For Food Bloggers and Pinterest Creators)
- Use natural lighting—Brookies look best with soft daylight highlighting their glossy top.
- Slice cleanly and stack slightly offset to show the three distinct layers.
- Include crumbs and scattered Oreo pieces for an authentic, homemade aesthetic.
- Add human touch—a hand holding a brookie makes the image more relatable.
- Optimize alt text with descriptive keywords:
“Close-up of gooey Oreo Brookies with brownie, cookie, and Oreo layers.”
Fun Twists and Themed Ideas
- Halloween Version: Use orange cream Oreos and drizzle with melted black chocolate.
- Christmas Brookies: Add crushed candy canes and white chocolate drizzle.
- Valentine’s Day Brookies: Swirl raspberry jam into the brownie layer before baking.
- Birthday Brookies: Fold rainbow sprinkles into the cookie layer for a celebratory twist.
- Vegan Option: Replace butter with vegan margarine and eggs with flaxseed “eggs.”
Troubleshooting: When Things Don’t Go Perfectly
Brookies too dry? You likely overbaked them. Remove when slightly underdone; they continue cooking as they cool.
Layers separating? Press the Oreos gently into the cookie dough to ensure adhesion.
Brownie cracked on top? That’s normal—it’s the classic brownie crust.
Brookies too sweet? Use dark cocoa powder or bittersweet chips next time to balance flavor.
Storing, Gifting & Sharing Ideas
These brookies make an ideal homemade gift. Stack three or four in a clear bag tied with a ribbon, or layer them in mason jars with parchment between slices.
For bake sales or parties, cut them into mini bites—two inches square—so guests can sample without feeling overwhelmed.
They also travel well; pack in airtight tins with parchment paper layers to prevent sticking.
The Story Behind the Brookie Craze
The brookie concept first gained popularity in American bakeries in the 2010s, where creative bakers sought to combine two classics—cookies and brownies—into one product. Adding Oreos was the next natural evolution, blending nostalgic flavors into a dessert that bridges generations.
Today, Oreo Brookies dominate Pinterest dessert boards and TikTok baking reels. The reason? They look as good as they taste—and they’re genuinely foolproof.
A Note on Balance: Sweetness and Texture
The key to a great brookie is balance. Too much sugar, and the texture becomes sticky; too little fat, and the base dries out. This recipe is carefully calibrated so that each bite tastes rich but not cloying, indulgent but not heavy.
If you prefer a slightly less sweet dessert, you can reduce the total sugar by about 15% without affecting texture. Conversely, for a deeper chocolate flavor, substitute 1 tablespoon of cocoa powder with melted dark chocolate.
Making It a Family Baking Tradition
Oreo Brookies are more than a dessert—they’re an activity. Kids love layering the Oreos and licking the spoons; adults love the nostalgia and ease. Baking them together on weekends or holidays turns an ordinary afternoon into a memory worth savoring.
You can even turn it into a game: each family member customizes one batch—mint, peanut butter, or s’mores—and everyone votes on their favorite version.
Conclusion: Indulgence, Simplified
When life feels hectic, dessert should be simple, comforting, and satisfying. Oreo Brookies deliver exactly that—no stress, no fancy techniques, just pure joy in every bite.
From the chewy cookie base to the iconic Oreo crunch and the fudgy brownie crown, each layer tells a story of flavor, texture, and creativity.