Few desserts evoke childhood joy quite like a beautifully layered Neapolitan cake. With its unmistakable trio of chocolate, vanilla, and strawberry, this cake brings together flavors that feel both nostalgic and sophisticated. It is the kind of dessert that captures attention the moment it appears on the table — vibrant, colorful, and irresistibly inviting.
But beyond its visual charm, the Neapolitan Layer Cake is beloved for its unique personality. It’s playful yet elegant. Familiar yet special enough for celebrations. Easy enough for beginners, but rewarding enough for experienced bakers who enjoy a multi-layered project. If you want a dessert that makes people pause, smile, and reach for their cameras, this is the one.
This comprehensive guide will walk you through everything — from ingredients to baking science, frosting techniques, troubleshooting tips, variations, storage guides, and step-by-step instructions. Whether you’ve made layered cakes before or this is your first attempt, this detailed article ensures your final result will be moist, flavorful, beautifully structured, and visually stunning.
Why Neapolitan Layer Cake Is So Special
1. Three Distinct Flavors in One Dessert
The combination of chocolate, vanilla, and strawberry is timeless for a reason. Each flavor complements the other:
- Chocolate brings warmth and depth
- Vanilla adds lightness and balance
- Strawberry introduces brightness and freshness
Together, they create a harmonious bite that feels fun, nostalgic, and indulgent.
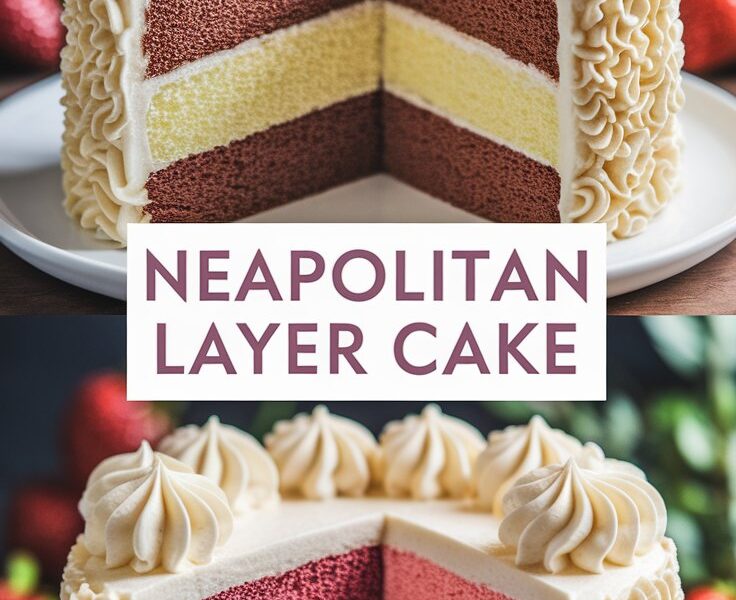
2. A Visually Stunning Presentation
The three-toned color palette makes the cake instantly impressive. When sliced, each piece shows off distinct stripes — a feature guests absolutely love.
3. Beginner-Friendly Yet Bakery-Quality
Despite its elegant appearance, the cake uses simple pantry ingredients and straightforward techniques. This means:
- No advanced tools
- No complicated methods
- No expensive ingredients
Just a little patience and layering.
4. Customizable for Any Occasion
This cake fits beautifully into:
- Birthdays
- Anniversaries
- Family celebrations
- Summer gatherings
- Dinner parties
- Holidays
You can also adapt the flavors, frosting style, and decorations to match a theme.
Ingredients Breakdown: What You Need and Why It Matters
Understanding ingredients helps you master the recipe — and improve it whenever needed. Here is a detailed breakdown of the essential components of a Neapolitan Layer Cake.
Flour
All-purpose flour provides the ideal structure without making the cake too dense. The protein level allows the layers to stay soft while holding up under frosting.
Baking Powder + Baking Soda
These leavening agents create the light, fluffy texture. They work in different ways:
- Baking powder reacts during mixing and baking
- Baking soda activates with acidic ingredients (like buttermilk)
Both are important for a well-risen cake.
Salt
Salt isn’t for flavor alone — it helps balance sweetness and enhances every taste, especially chocolate and strawberry.
Butter
Softened unsalted butter creates tenderness and richness. Proper creaming incorporates air, resulting in a beautiful crumb.
Sugar
Granulated sugar adds sweetness but also contributes to moisture and structure. It helps the cake caramelize slightly while baking.
Eggs
Eggs bind the batter, add moisture, and help develop structure. Room-temperature eggs mix more smoothly.
Buttermilk
This is a star ingredient — it tenderizes the crumb and makes the cake soft, moist, and flavorful. If you don’t have it, milk mixed with vinegar is an excellent substitute.
Vanilla Extract
Even when it’s not a vanilla layer, vanilla rounds out the flavors and adds warmth — absolutely essential.
Cocoa Powder
A high-quality cocoa transforms the chocolate layer from simple to decadent. Look for unsweetened cocoa with a deep aroma.
Strawberry Puree or Jam
This gives the strawberry layer its identity. Puree is deeply fruity, while jam provides convenience. You can boost color with a touch of pink coloring.
Frosting Ingredients (Butter, Powdered Sugar, Vanilla, Milk)
Classic buttercream ties the dessert together. Smooth, creamy, and lightly sweetened, it enhances each layer without overpowering them.
Equipment You Will Need
This recipe doesn’t require professional tools. You can prepare it easily using:
- Mixing bowls
- A hand mixer or stand mixer
- Measuring cups and spoons
- Rubber spatula
- Three 8-inch cake pans
- Parchment paper
- Cooling rack
- Offset spatula (optional but useful)
If you have only one or two cake pans, don’t worry — you can bake the batter in batches.
Step-by-Step Instructions: Creating the Perfect Neapolitan Layer Cake
This is a comprehensive, user-friendly guide with expert baking insights included in every stage.
Step 1: Preheat and Prepare the Pans
Set your oven to 350°F (175°C). Grease three round 8-inch cake pans and line each with parchment paper. This ensures the cakes release easily, keeping the layers clean and intact.
Why this matters:
Layered cakes rely on flat, even surfaces. Parchment prevents sticking, tearing, and breakage.
Step 2: Combine Dry Ingredients
Whisk together:
- Flour
- Baking powder
- Baking soda
- Salt
Sifting or whisking removes lumps and creates an even mixture, which ensures consistent texture throughout.
Step 3: Cream Butter and Sugar
Beat softened butter with granulated sugar until light and fluffy. This step usually takes 3–5 minutes.
Professional tip:
Creaming introduces air, which makes the cake rise beautifully. Undermixing leads to dense layers.
Step 4: Incorporate Eggs and Vanilla
Add eggs one at a time, mixing thoroughly after each addition. Then blend in vanilla extract.
Why room temperature eggs matter:
They mix faster and prevent the butter from curdling.
Step 5: Create the Final Batter
Alternate between adding the dry mixture and the buttermilk:
- Start with dry
- Add wet
- Continue until smooth
This prevents overmixing and keeps the crumb tender.
Step 6: Divide and Flavor the Batter
Chocolate Layer
Add cocoa powder and a spoonful of milk to one portion. Mix gently.
Vanilla Layer
Leave the second portion plain — its simplicity balances the other flavors.
Strawberry Layer
Add strawberry puree or jam and optional pink coloring to the third portion.
Tip for best fruit flavor:
Use fresh strawberry puree when possible.
Step 7: Bake the Layers
Transfer each batter into its pan. Bake for 20–25 minutes or until a toothpick inserted in the center comes out clean.
Let cakes cool 10 minutes in the pans, then transfer to wire racks.
Step 8: Prepare the Buttercream Frosting
Beat softened butter until creamy, then slowly add powdered sugar. Mix in vanilla and milk until smooth and spreadable.
Step 9: Assemble the Cake
- Start with the chocolate layer.
- Spread a thin layer of frosting.
- Add the vanilla layer, frost again.
- Finish with the strawberry layer.
- Frost the exterior smoothly.
Chill for 30 minutes before slicing. This gives the cake stability and clean layers.
Expert Baking Tips for Perfect Results
1. Use Room Temperature Ingredients
They blend better and create an even batter.
2. Don’t Overmix
Overmixing develops gluten, resulting in a dense cake.
3. Level Your Layers
If the cakes dome slightly, trim the tops for a bakery-smooth finish.
4. Use High-Quality Flavor Ingredients
Real vanilla. Good cocoa. Fresh berries. It makes a dramatic difference.
5. Chill Before Frosting
Frosting attaches better to firm layers, preventing crumbs.
Troubleshooting Guide
Cake Came Out Dense
Possible causes:
- Not enough creaming
- Overmixing
- Old baking powder
Cake Layers Sank in the Middle
Reasons may include:
- Oven temperature too low
- Opening the oven door early
- Underbaked cakes
Frosting Is Too Soft
Solutions:
- Add more powdered sugar
- Chill for 15 minutes
- Use cold butter when whipping
Strawberry Layer Is Watery
Fixes:
- Use thick puree or jam
- Add 1–2 teaspoons of flour to absorb excess moisture
Variations You Can Try
Berry Swap
Replace strawberry with raspberry or blueberry puree.
Extra Chocolate
Add chocolate chips to the chocolate layer for added richness.
Cream Cheese Frosting
For a tangy twist, replace traditional buttercream.
Gluten-Free Version
Use a gluten-free flour blend with xanthan gum.
Dairy-Free Version
Use dairy-free butter and plant-based milk.
Sheet Cake Version
Bake in a 9×13-inch pan and swirl the three batters for a marbled effect.
Serving Suggestions
- Top with chocolate shavings
- Add fresh strawberries
- Serve chilled with ice cream
- Drizzle with chocolate or berry sauce
- Present on a glass cake stand for a dramatic look
Storage Guide
Room Temperature
Up to 1 day in a covered container.
Refrigerator
Lasts 3–4 days.
Freezer
Freeze unfrosted layers for up to 3 months.
Thaw in the fridge overnight.
Frequently Asked Questions
Can I make this cake ahead of time?
Yes — you can bake layers one day earlier and frost the next day.
Can I freeze the whole cake?
Yes, but wrap tightly in plastic to prevent moisture loss.
Can I use boxed mix?
Yes, but homemade gives much better flavor and texture.
How do I get perfectly even layers?
Weigh the batter to ensure each pan receives the same amount.
Final Thoughts
The Neapolitan Layer Cake is more than just a dessert — it’s a joyful celebration of color, taste, and nostalgia. With its striking trio of layers and balanced flavors, it’s a cake that feels familiar yet festive, simple yet sophisticated. Whether you’re baking it for a special event or just to brighten an ordinary day, it has a magical way of bringing people together.
This guide equips you with everything you need — professional tips, ingredient knowledge, troubleshooting advice, variations, and clear instructions. Follow the steps patiently, and you’ll end up with a cake that looks stunning, tastes incredible, and delivers a showstopping moment at your table.