As October nights grow cooler and pumpkins glow on doorsteps, the kitchen becomes a place of magic. The air fills with the scent of cinnamon, cocoa, and sweet treats waiting to be shared. Halloween isn’t only about costumes and candy—it’s also the perfect time to whip up something fun, colorful, and irresistibly spooky.
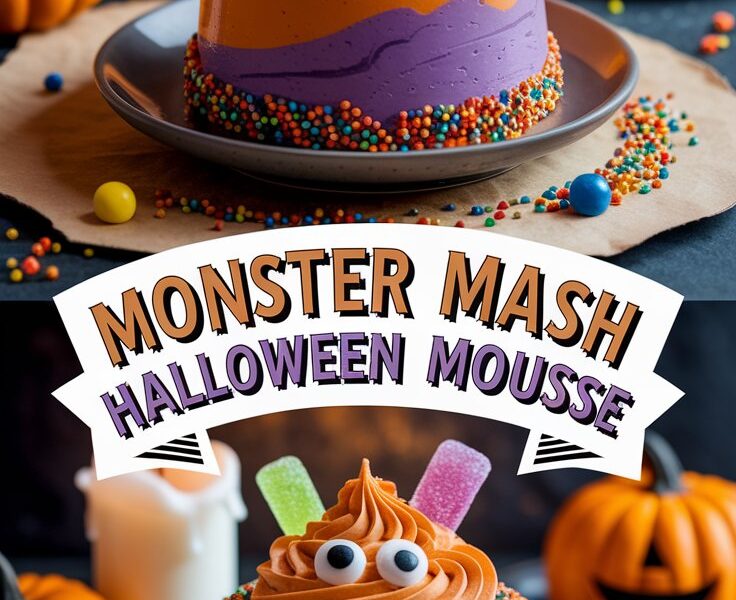
Enter the Monster Mash Halloween Mousse—a dessert that transforms ordinary ingredients into layers of playful, silky perfection. This no-bake treat combines bright orange and purple mousse, topped with candy eyeballs, gummies, and sprinkles that sparkle like midnight stars.
It’s not just a dessert—it’s a little edible celebration of everything whimsical about Halloween. Whether you’re hosting a costume party, preparing a classroom treat, or creating a surprise for your family, this mousse promises joy, laughter, and a spoonful of frightful fun.
👻 Why You’ll Love Monster Mash Halloween Mousse
This isn’t your average mousse. It’s quick, creative, and guaranteed to make guests gasp in delight before they even take a bite. Here’s why you’ll love it:
- No-Bake Perfection: Forget turning on the oven—this recipe is pure magic mixed in a bowl.
- Vibrant & Festive: Orange and purple layers give it that unmistakable Halloween energy.
- Kid-Friendly & Fun: Children love helping with the coloring, layering, and decorating.
- Customizable: You can tweak flavors, colors, and toppings to fit any spooky theme.
- Make-Ahead Friendly: It tastes even better after chilling overnight, making party prep stress-free.
🍫 Ingredients You’ll Need
Before we start mixing up the monster magic, gather these simple ingredients. Everything is easy to find and budget-friendly.
For Each Mousse Layer
- 1 cup (240 ml) heavy whipping cream, chilled
- 100 g (3.5 oz) white chocolate, chopped
- 2 tablespoons cream cheese, softened
- 1 teaspoon vanilla extract
- A few drops of gel food coloring (orange for one batch, purple for the other)
For Decorations
- Candy eyeballs (for that ghoulish charm)
- Gummy worms or Halloween-themed gummies
- Rainbow sprinkles or colored sugar crystals
- Optional: Crushed cookies, mini marshmallows, or chocolate spiders for topping
🧙♀️ Equipment Checklist
- Mixing bowls (chilled if possible)
- Electric hand mixer or stand mixer
- Spatulas for folding
- Microwave-safe bowl or double boiler for melting chocolate
- Piping bags or zip-top bags for layering
- Clear glasses, jars, or cups for serving
- Toothpick or skewer for swirling colors
🧁 Step-by-Step: How to Make Monster Mash Halloween Mousse
Step 1: Melt the Chocolate
Start by gently melting the chopped white chocolate. Use the microwave in 20-second bursts or set up a double boiler for even heating. Stir until smooth, then let it cool slightly so it won’t melt your whipped cream later.
Step 2: Blend the Base
In a bowl, beat the softened cream cheese and vanilla extract until creamy. Pour in the melted white chocolate and whisk until silky. This creates the rich foundation of your mousse.
Step 3: Whip It Up
In a separate chilled bowl, beat the heavy cream until soft peaks form. Don’t overwhip—soft and fluffy is the goal.
Step 4: Fold and Color
Gently fold the whipped cream into the chocolate mixture using slow, circular motions. Divide the mixture in half. Tint one half orange and the other purple using gel food coloring. Mix until you get bright, bold hues.
Step 5: Chill the Mousse
Refrigerate both bowls for 15–20 minutes. Chilling helps the mousse firm up for cleaner, defined layers.
Step 6: Assemble the Monster Mash
Grab your clear glasses or cups. Alternate spoonfuls or piped layers of orange and purple mousse, creating stripes or swirls. For a marbled “monster slime” look, swirl gently with a skewer or toothpick.
Step 7: Decorate the Magic
Top each serving with candy eyeballs, gummy worms, sprinkles, and whatever spooky candies you love. Let your creativity run wild—this dessert is all about fun and flair.
💡 Pro Tips for Perfect Mousse
- Chill Everything: Cold bowls, whisks, and cream ensure maximum fluff.
- Go Gel: Gel coloring produces brighter tones without watering down your mousse.
- Slow Folding: Always fold gently; overmixing deflates the mousse’s airy texture.
- Make Ahead: Prepare a day early—the flavors meld beautifully overnight.
- Serve Cold: For the best texture, serve straight from the fridge.
🕯️ Flavor & Texture Notes
The first spoonful of this mousse melts like a dream—light yet indulgent. The white chocolate brings creamy sweetness, while the cream cheese adds a subtle tang that balances the sugar perfectly. The orange and purple layers contrast not just in color but in mood: sunny playfulness meets mysterious depth.
Every bite offers a mix of smooth mousse and chewy candy, making it both sophisticated and playful. It’s the kind of dessert that sparks conversation at every Halloween party.
🎨 Creative Variations
You can transform this recipe in countless ways. Here are some spooky spins to try:
1. Chocolate Monster Mash
Swap white chocolate for dark or milk chocolate to create richer, deeper flavors. Add a pinch of espresso powder for intensity.
2. Fruity Fright Delight
Layer fruit puree—raspberry, mango, or blueberry—between mousse layers for color contrast and natural sweetness.
3. Dairy-Free Haunt
Use coconut cream and dairy-free chocolate for a vegan-friendly option that’s just as creamy.
4. Flavored Extract Fun
Experiment with orange, almond, or mint extract to change the aroma and taste profile.
5. Crunchy Graveyard Version
Add crushed chocolate cookies at the bottom of each glass to mimic dirt. Top with a gummy worm “crawling out” for a graveyard effect.
🕸️ Serving Ideas
Presentation is half the fun. Here are festive ways to serve your Monster Mash Mousse:
- Serve in mini cauldrons or Halloween-themed cups.
- Add chocolate “bones” or ghost-shaped marshmallows on top.
- Pair with pumpkin spice latte or apple cider for cozy vibes.
- Create a dessert bar with bowls of toppings so guests can customize.
🍽️ Storage & Shelf Life
Store your mousse covered in the refrigerator for up to three days. It’s best enjoyed within 24 hours while the texture is lightest. Avoid freezing—it may cause separation once thawed.
If making ahead for a party, prepare the mousse layers the day before and decorate right before serving for the freshest look.
🧾 Nutrition (per serving, approx.)
- Calories: 350
- Fat: 25 g
- Saturated Fat: 15 g
- Carbohydrates: 30 g
- Sugar: 25 g
- Protein: 3 g
- Fiber: 1 g
- Sodium: 50 mg
This treat is indulgent but portion-controlled—perfect for a once-a-year spooky celebration.
🪄 Troubleshooting Common Mistakes
| Problem | Likely Cause | Easy Fix |
|---|---|---|
| Mousse too thin | Cream under-whipped or too warm | Chill and re-whip slightly |
| Lumpy texture | Chocolate not cooled before mixing | Let melted chocolate cool longer |
| Faded colors | Used liquid food dye | Switch to gel coloring |
| Layers collapsed | Overfolded mixture | Fold gently with spatula |
| Candy sinking | Mousse too soft before topping | Chill layers 10 min before decorating |
🍁 The Magic of Making It with Kids
Few desserts capture kids’ attention like this one. Children love picking colors, swirling layers, and sticking candy eyeballs into “monster faces.” It’s sensory, creative, and educational—teaching patience, color mixing, and teamwork in the sweetest way possible.
For younger helpers, pre-measure ingredients. Let them handle safe steps like folding mousse, sprinkling candies, or designing monster expressions on top.
🎉 Party Presentation Ideas
If you’re hosting a Halloween party, the Monster Mash Mousse can easily become the centerpiece of your dessert table. Try these presentation tricks:
- Create a Monster Dessert Bar: Set out mousse cups, candies, and toppings—let guests assemble their own spooky creations.
- Add Lighting Magic: Place cups on a tray with LED candles or fairy lights underneath for an eerie glow.
- Name Tags for Fun: Label each mousse cup with funny names like “Witch’s Pudding,” “Zombie Slime,” or “Ghost Goo.”
- Layered Trifle Version: For larger gatherings, assemble the mousse in a glass trifle bowl with multiple colorful layers and candy between each.
🌟 Healthier Halloween Swaps
Want to lighten things up a bit? Try these guilt-free adjustments:
- Replace part of the whipped cream with Greek yogurt for protein and tang.
- Use stevia or monk fruit sweetener in place of part of the sugar.
- Choose dark chocolate for antioxidants.
- Add pureed pumpkin to the orange layer for extra fiber and seasonal flavor.
These swaps maintain the festive appeal while trimming calories—a win for both flavor and fitness.
🕷️ FAQs About Monster Mash Halloween Mousse
Q1. Can I make it ahead of time?
Absolutely! Prepare the mousse layers one day in advance and refrigerate. Decorate just before serving for best presentation.
Q2. What if I don’t have white chocolate?
You can substitute milk or dark chocolate. Adjust the sweetness by reducing cream cheese slightly.
Q3. Can I use liquid food coloring?
You can, but gel coloring gives richer results without thinning the mousse.
Q4. How long should I chill it?
At least 30 minutes before serving; overnight is ideal for firm, layered texture.
Q5. Is it suitable for kids with allergies?
Yes—just ensure your candies are nut-free and gelatin-free if needed. Always read labels carefully.
Q6. How can I make it vegan?
Use coconut cream, vegan white chocolate, and plant-based cream cheese substitutes. The result is still smooth and delicious.
Q7. Can I store leftovers?
Yes. Cover tightly and refrigerate for up to three days. Avoid freezing—it changes the consistency.
🧡 Storytime: Where the Idea Came From
This recipe was born on a chilly October evening when the kitchen lights flickered and laughter echoed from little goblins in costume. I wanted to create something festive yet simple—something that even tired parents could pull together after work.
The idea struck as I looked at a bag of white chocolate chips and a few food colorings left from another recipe. Why not combine them into a playful mousse? Within an hour, the first Monster Mash was born—gooey, colorful, and a total hit. The kids devoured it, and the adults couldn’t stop smiling.
Now, it’s become a Halloween tradition—a yearly reminder that creativity can turn ordinary nights into magical memories.
🕯️ Final Thoughts
Creating Monster Mash Halloween Mousse is more than following steps—it’s about sharing laughter, color, and imagination. This dessert embodies the Halloween spirit: equal parts fun and flavor, mischief and magic.
It proves that great food doesn’t have to be complicated. With a few simple ingredients and a splash of creativity, you can craft something that delights both kids and adults alike.