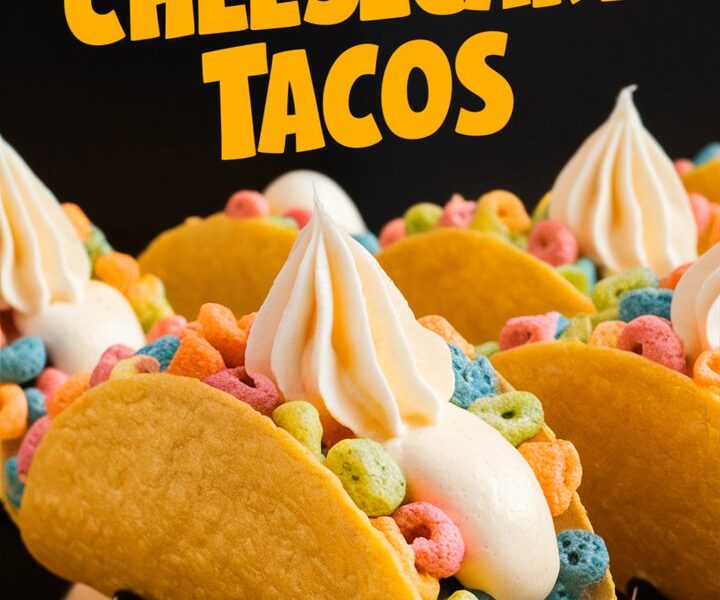
Imagine biting into a rainbow—one that’s crunchy on the outside and filled with rich, creamy cheesecake inside. Welcome to the world of Fruity Pebbles Cheesecake Tacos, a dessert that’s as fun to make as it is to eat.
These no-bake dessert tacos are the perfect fusion of nostalgia and modern indulgence. Combining the fruity crunch of your favorite childhood cereal with the velvety richness of a whipped cheesecake filling, they’re the ultimate treat for birthdays, movie nights, family fun, or even creative brunches.
Whether you’re a parent looking for a fun baking activity with kids, a party host seeking a vibrant centerpiece dessert, or just a sweet-toothed foodie searching for something new—this recipe delivers color, flavor, texture, and wow-factor all in one.
Why Fruity Pebbles Cheesecake Tacos Are Taking Over Dessert Trends
Here’s why these dessert tacos are becoming a Pinterest and Instagram sensation:
- ✅ No Baking Required: Skip the oven—perfect for summer or quick prep.
- ✅ Minimal Ingredients: Uses pantry-friendly items you likely already have.
- ✅ Kid-Friendly: Safe and fun for children to help with.
- ✅ Customizable: You can switch up the cereal, fillings, and toppings endlessly.
- ✅ Visually Stunning: A rainbow presentation that’s sure to turn heads at any party.
Ingredients Overview
Let’s start with the base: crispy cereal taco shells and a no-fuss cheesecake filling. Here’s everything you need:
🔸 For the Taco Shells:
- 2 cups Fruity Pebbles cereal
- 2 tablespoons unsalted butter
- 1 bag (10 oz) mini marshmallows
🔸 For the Cheesecake Filling:
- 8 oz cream cheese (softened to room temperature)
- 1 cup heavy whipping cream
- ½ cup powdered sugar
- 1 tsp vanilla extract
🔸 Optional Toppings (Choose Your Style):
- Whipped cream
- More Fruity Pebbles for garnish
- Rainbow sprinkles
- Mini marshmallows
- Melted white chocolate drizzle
- Sliced strawberries or other fresh fruit
- Crushed cookies (e.g., Oreos, graham crackers)
Essential Tools You’ll Need
No need for fancy kitchen gadgets! Just gather the following:
- Large saucepan or microwave-safe bowl
- Silicone spatula or wooden spoon
- Muffin tin or rolling pin (for shaping shells)
- Two mixing bowls
- Hand or stand mixer
- Piping bag or large zip-top bag
- Measuring cups and spoons
Step-by-Step Instructions: How to Make Fruity Pebbles Cheesecake Tacos
🔹 Step 1: Make the Taco Shells
Pro Tip: Work quickly here—marshmallow sets fast!
- Melt the butter in a saucepan over low heat.
- Add marshmallows and stir continuously until smooth and fully melted.
- Remove from heat and fold in Fruity Pebbles gently until evenly coated.
- Immediately spoon ¼ cup portions onto parchment paper.
- Flatten each portion into a 4–5 inch round.
- Drape each round over the backside of a muffin tin or rolling pin to form taco shapes.
- Let them cool and harden for about 10–15 minutes.
Quick Note: Lightly greasing your hands helps prevent sticky fingers during shaping.
🔹 Step 2: Prepare the Cheesecake Filling
This no-bake filling is light, fluffy, and pairs beautifully with the crunchy shells.
- In a chilled bowl, beat the heavy whipping cream until stiff peaks form. Set aside.
- In another bowl, beat the softened cream cheese until smooth and lump-free.
- Add powdered sugar and vanilla extract. Beat until light and fluffy.
- Gently fold the whipped cream into the cream cheese mixture.
- Chill for 20–30 minutes for easier piping.
🔹 Step 3: Assemble and Decorate
- Once the taco shells are firm, pipe or spoon the cheesecake filling into each shell.
- Top creatively: sprinkles, extra cereal, berries, whipped cream—go wild!
- Serve immediately, or refrigerate for up to 2 hours.
Flavor Variations to Try
Want to make this recipe your own? Try these swaps and twists:
- 🍫 Chocolate Lovers: Use Cocoa Pebbles instead of Fruity Pebbles.
- 🍋 Citrus Pop: Add lemon zest to the filling.
- 🥥 Tropical Vibe: Use coconut flakes and mango chunks.
- 🍓 Berry Blend: Swirl in raspberry jam before piping the filling.
- 🎉 Birthday Party: Add cake crumbs and rainbow confetti sprinkles.
Serving Ideas & Presentation Tips
Make your dessert table pop with these ideas:
- Serve in a taco stand upright, garnished with mint leaves.
- Create a mini dessert taco bar for parties where guests build their own.
- Add dipping sauces like white chocolate ganache or berry coulis.
- Place each taco in cupcake wrappers for easy handling and mess-free eating.
Make It a Fun Activity for Kids
This recipe is perfect for involving young bakers. Here’s how:
- Let them press the cereal mixture into shape.
- Use small cookie cutters to make fun shapes (mini taco shells).
- Turn it into a decorating challenge—kids love edible crafts!
- Set up a toppings station where they create their own masterpiece.
How to Store Fruity Pebbles Cheesecake Tacos
- Unfilled taco shells: Store in an airtight container at room temperature for up to 4 days.
- Cheesecake filling: Refrigerate separately for up to 5 days.
- Assembled tacos: Best eaten the same day. If stored, keep refrigerated and consume within 1–2 days. The shells may soften over time.
Tip: For best results, assemble tacos just before serving to preserve crunch.
Nutrition Info (Per Taco, Approximate)
- Calories: 260
- Carbohydrates: 32g
- Sugar: 20g
- Fat: 13g
- Protein: 3g
- Fiber: 1g
- Sodium: 75mg
Note: Values vary based on toppings and cereal brand.
Common Mistakes to Avoid
- ❌ Shaping too slowly: The cereal mix firms quickly—shape while warm!
- ❌ Overfilling: It can make the tacos collapse or break.
- ❌ Thick shells: Thicker means tougher—keep it thin and flexible.
- ❌ Skipping chill time: The cheesecake needs firmness to hold shape.
- ❌ Not greasing hands: Marshmallow mixture is sticky—prep your hands.
Frequently Asked Questions
❓ Can I make them ahead?
Yes! You can make the taco shells and cheesecake filling a day in advance and store them separately.
❓ Are they freezer-friendly?
Only the cheesecake filling can be frozen. The cereal shells will lose texture.
❓ Can I use different cereal?
Absolutely. Cocoa Pebbles, Rice Krispies, even Trix or Corn Flakes can be used.
❓ Are they gluten-free?
If you use gluten-free cereal and marshmallows, yes!
❓ How do I make them mini?
Scoop 1 tbsp of cereal mixture per shell and mold over a spoon handle or shot glass for tiny tacos.
Ideas for Events and Occasions
- 🥳 Birthday Parties: Use theme-colored sprinkles and toppers.
- 👨👩👧👦 Family Game Night: Let everyone build their own taco.
- 🌈 Pride Events or Colorful Celebrations: Embrace the rainbow!
- 🎓 Graduation Parties: Decorate with school colors or initials.
- 🎄 Holidays: Try holiday cereals (like red and green Rice Krispies).
More Easy No-Bake Dessert Ideas to Try
If you loved these Fruity Pebbles Cheesecake Tacos, you’ll also enjoy:
- No-Bake Oreo Cheesecake Cups
- Strawberry Cheesecake Bites
- Rice Krispie Donut Rings
- Chocolate-Dipped Cookie Sandwiches
- Funfetti Cake Truffles
These recipes keep things simple, fun, and festive—ideal for stress-free entertaining.
Conclusion: A Rainbow You Can Eat
Fruity Pebbles Cheesecake Tacos are more than a dessert—they’re an experience. Bright, cheerful, and undeniably delicious, they bring the fun back into your kitchen with every bite.
Whether you’re surprising your kids, dazzling your party guests, or just treating yourself to a moment of colorful joy, this is a dessert that checks all the boxes: easy, eye-catching, and unforgettable.